Imagine you're baking your favorite cake. You wouldn't just throw it in an oven set to any temperature, right? If it's too hot, your cake burns to a crisp. If it's too cold, it stays gooey and uncooked. Just like baking a cake needs the perfect conditions, working with concrete needs the right weather! It’s super important to understand how climate – that’s the typical weather in a specific place, whether it’s sunny California or snowy Minnesota – affects concrete.
Knowing this helps you make incredibly smart choices, ensuring your concrete driveways, patios, or foundations last a long, long time and don't give you headaches down the road.
The Great Outdoors and Your Concrete: Hot vs. Cold Weather
Think of concrete like a giant, liquid rock when it’s first mixed. When you pour it, it needs to cure, which is just a fancy word for slowly hardening and getting super strong. This hardening happens because of a chemical reaction between cement and water. The temperature where this reaction takes place plays a huge, huge role in how well it all works out.
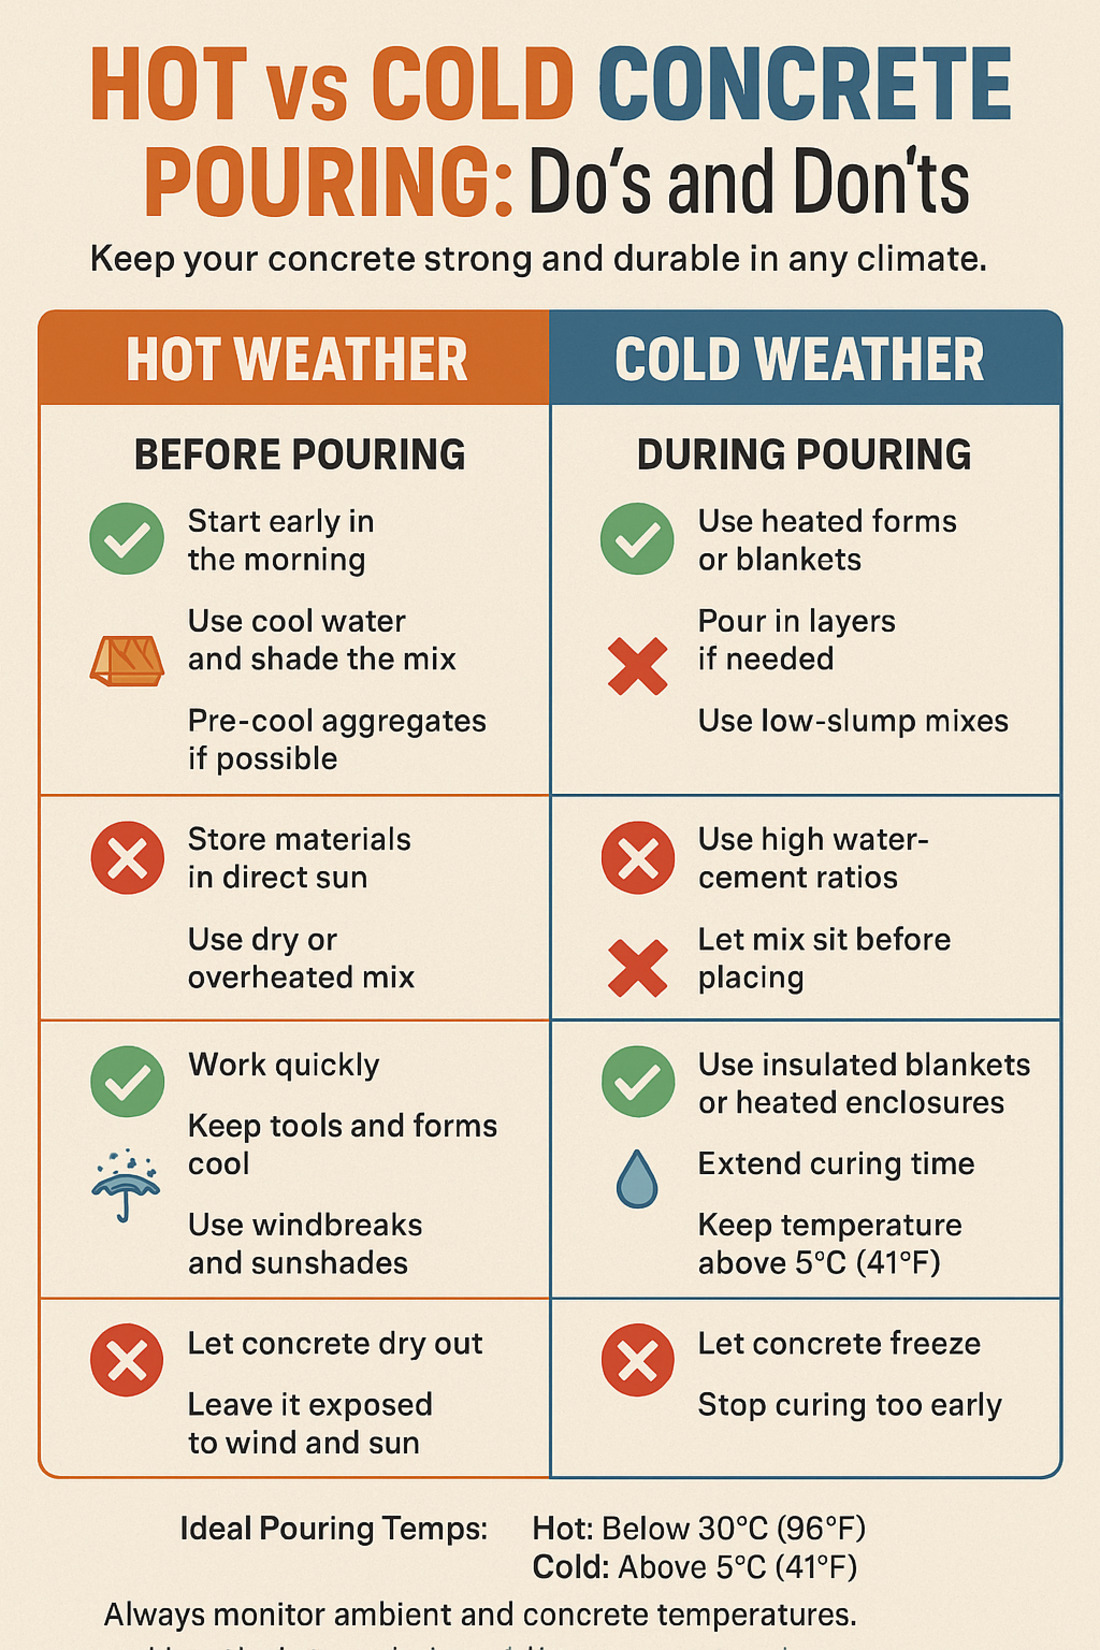
Pouring in Hot Weather
Have you ever seen a puddle on a really hot summer day disappear almost instantly? That’s evaporation! The exact same thing can happen to the water in your freshly poured concrete when the temperatures soar.
When you pour concrete on a really hot day, a few things can go wrong, and they’re not pretty:
It Dries Out Too Fast
The water that's so crucial for concrete's hardening process can evaporate quicker than you can say "Aaaconcreting!" If the water leaves too soon, the concrete doesn’t have enough time to finish its chemical reaction and gain its full strength. Imagine trying to bake that cake without enough water; it just won't be as solid or strong as it should be. It might look okay on the surface, but underneath, it's weaker.
Cracks Can Appear Like Magic
When concrete dries too fast, it can shrink unevenly. Picture a piece of wet clay drying out in the sun; it often cracks as it shrinks. Concrete can do the same thing, leading to unsightly and weak spots. These are often called shrinkage cracks, and they can be a real headache, sometimes allowing water to get in and cause even more problems later.
Workers Have a Hard Time
Concrete needs to be smoothed, leveled, and shaped after it’s poured. This process is called finishing. If the concrete starts to harden too quickly because of the heat, the workers might not have enough time to finish the job properly. This can lead to a rough, uneven, or less-than-perfect surface, which nobody wants for their beautiful new patio or driveway.
So, what’s the smart way to handle concrete on a sweltering day?
- Pour Early in the Morning: Just like you might go for a jog before the heat of the day kicks in, pouring concrete in the coolest part of the day (which is usually early morning) gives it more time to set and cure properly before the blazing afternoon sun takes over.
- Keep it Wet (Curing, Curing, Curing!): After concrete is poured and finished, it absolutely needs to stay moist for a while to cure properly. This is called curing, and it’s arguably the most important step for hot weather concrete. You can do this by regularly misting it with water (like watering a garden), covering it with special blankets called curing blankets, or even using plastic sheets to trap the moisture in. Think of it like putting a lid on a pot to keep the steam in – you're trying to keep that precious moisture from escaping.
- Use Special Additives: Concrete can add extra ingredients to its "recipe" to help it out in extreme conditions. For hot weather, some of these additives, called retarders, can actually slow down the hardening process. This gives the workers more time to finish the job carefully. Other additives can help the concrete retain its water longer.
Successfully pouring concrete in hot weather requires precision and the right materials. Don't risk costly mistakes! Connect with a local concrete contractor today to ensure your hot-weather pour is handled perfectly.
Pouring in Cold Weather
Now, let's switch gears to the complete opposite extreme: freezing cold weather. This can be even more dangerous for fresh concrete than hot weather!
What happens if the water inside fresh concrete freezes? Think about what happens when you put a soda can in the freezer – pop! It expands and can even explode. Water does the same thing when it turns to ice.
Water Freezes and Expands
If the water in fresh concrete freezes before the concrete has gained enough strength (before it’s properly hardened), it expands. These tiny ice crystals create pressure, pushing against the concrete from the inside and seriously damaging its structure. It’s like having thousands of tiny, internal explosions happening all through your brand-new concrete!
Weak, Crumbling Concrete
Concrete that freezes too early will be much, much weaker than it should be. It won’t last as long, and it can crumble easily and crack, simply failing to do the job it was designed for. This is a costly mistake you definitely want to avoid.
Slower Setting Times
Even if it doesn't quite freeze, very cold temperatures drastically slow down the chemical reaction that makes concrete harden. This means it takes a much longer time for the concrete to become strong enough to walk on, drive on, or support any weight. This can delay your project significantly and leave your concrete vulnerable for longer.
So, how do you pour concrete when it’s chilly outside?
- Heat Materials: Just like you preheat your oven before baking, you can gently heat the water or sand used in the concrete mix. This gives the concrete a warmer start and helps the hardening process begin more effectively.
- Use Blankets and Covers: The concrete needs to be kept warm after pouring. Special insulating blankets, thick tarps, or even a layer of straw can be used to cover the concrete and trap any heat within it. This is like wrapping a baby in a warm blanket to keep it cozy and protected from the cold.
- Special Cold-Weather Mixes: Some concrete mixes are specifically designed to work better in colder temperatures. They might contain accelerators, which are additives that speed up the hardening process. Special concretes can also be poured at lower temperatures with less risk.
- Avoid Pouring on Frozen Ground: Pouring warm concrete directly onto frozen ground is a recipe for disaster. The ground underneath can thaw unevenly, causing the concrete to settle and crack. Always make sure the ground is thawed and stable before pouring.
Pouring concrete when temperatures drop below freezing demands expert knowledge and specialized techniques. For a durable, long-lasting result, reach out to a local concrete contractor who specializes in cold-weather concrete pours.
Hot vs Cold Concrete Pouring Do’s and Don’ts.
The Freeze-Thaw Tango: A Major Threat
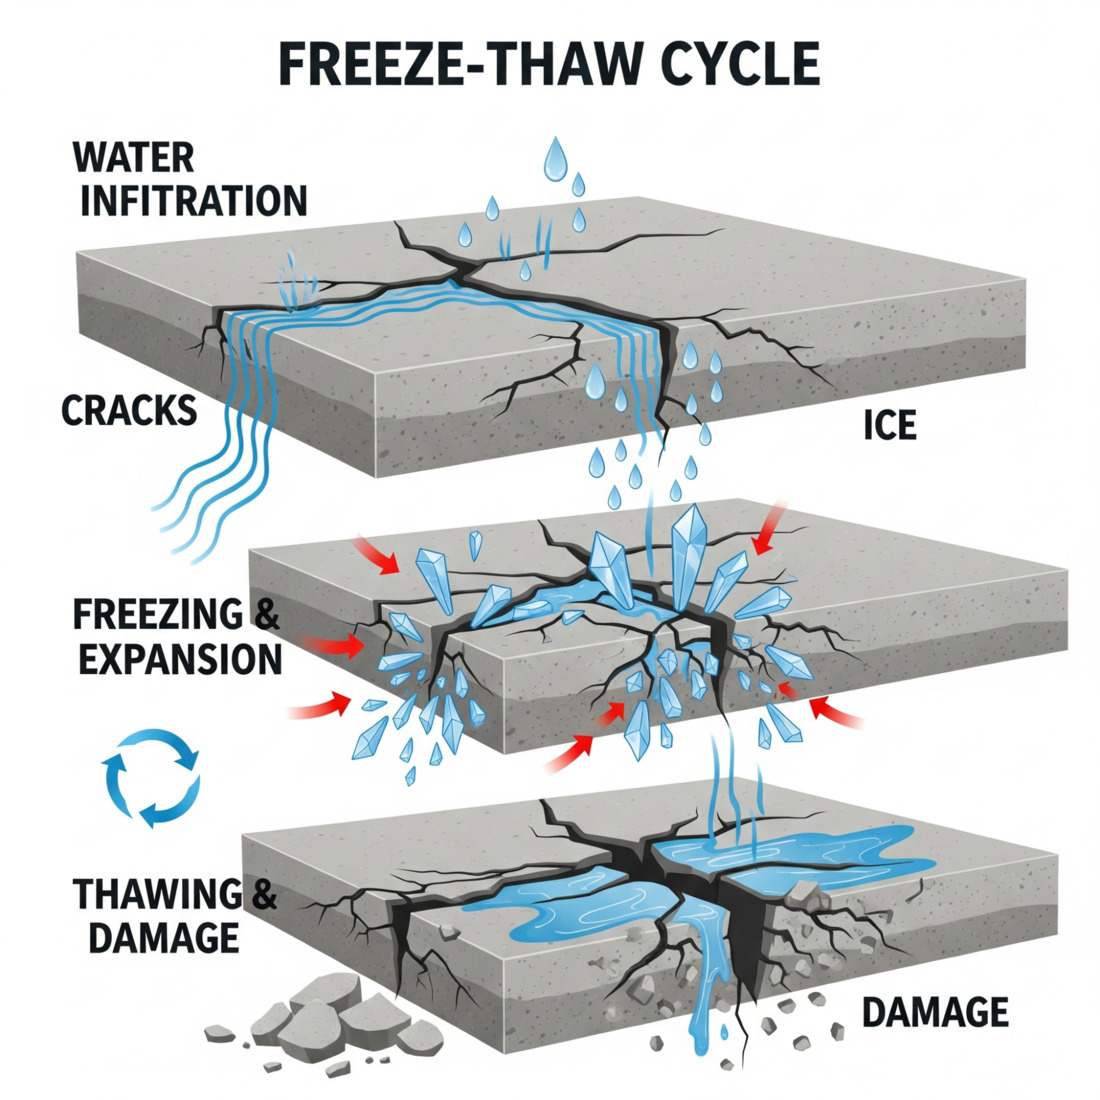
This is a big deal for many parts of the United States, especially anywhere that gets cold winters with repeated freezing and thawing cycles. It’s called the freeze-thaw cycle, and it’s a major cause of concrete damage.
Imagine a tiny, invisible crack in your concrete. Now, it rains or snows, and water seeps into that tiny crack. Then, the temperature drops below freezing, and that water turns into ice. Remember how water expands when it freezes? Well, that tiny bit of ice now pushes against the sides of the crack, making it a little bit bigger.
When the weather warms up, the ice melts, and the water flows even deeper into the now-bigger crack. Then, when temperatures drop, it freezes, expands, and makes the crack even wider. This process, repeated repeatedly – freeze, thaw, freeze, thaw – is like a tiny hammer constantly chipping away at your concrete from the inside out. Over time, these small cracks become bigger, leading to crumbling surfaces, ugly potholes, and severe, costly damage to your concrete.
How can you protect your concrete from this damaging freeze-thaw dance?
Proper Drainage
Water is the ultimate enemy here! Make absolutely sure your concrete surfaces have good drainage around them, so water doesn't sit on the surface or collect near it. Sloping the concrete slightly so water runs off into a drain or a grassy area is a fantastic idea and a key preventative measure.
Good Quality Concrete (Air-Entrained is Key!)
This is where concrete's "recipe" really matters. For areas with freezing winters and regular freeze-thaw cycles, you absolutely need air-entrained concrete. This means that during mixing, tiny, microscopic air bubbles are intentionally created and trapped inside the concrete.
Studies by the National Ready Mixed Concrete Association (NRMCA) consistently demonstrate that properly air-entrained concrete can withstand hundreds of freeze-thaw cycles without significant damage. This is a vast improvement over non-air-entrained concrete and significantly extends its lifespan.
Think of them like tiny, flexible airbags or empty rooms within the concrete. When water freezes and expands inside the concrete, these little air bubbles act as pressure relief valves, giving the expanding ice somewhere to go without pushing on and damaging the actual concrete structure. It’s like having a built-in cushion for the ice – a brilliant solution!
Sealants and Coatings
Just like you might put a protective sealant on your wooden deck to protect it from water, you can apply special concrete sealants to your finished concrete. These sealants create a barrier that prevents water from soaking into the concrete’s tiny pores and hairline cracks, thus greatly reducing the chance of freeze-thaw damage. Think of it as putting a raincoat on your concrete.
Protecting your concrete from the damaging freeze-thaw cycle is crucial for its lifespan. To discuss air-entrained concrete, proper drainage, or durable sealants for your property, contact a trusted local concrete contractor near you today!
Best Time of Year to Pour
So, knowing all this about how hot and cold weather affects concrete, when’s the “sweet spot” or the ideal time to pour concrete?
Generally, the dream conditions for pouring concrete are:
- Moderate Temperatures: Not too hot, not too cold. Think of it like a perfectly comfortable room temperature for people – somewhere between 50°F and 77°F (10°C to 25°C) is often considered ideal. This allows the concrete to cure steadily and gain strength without being rushed or stalled.
- Low Humidity: While high humidity can sometimes slow down drying a bit, the main concern for humidity is usually linked to very hot weather and rapid evaporation.
- No Rain or Extreme Wind: Heavy rain can literally wash away the cement paste, weakening the concrete significantly. Strong winds can speed up the evaporation of water, similar to what happens in hot temperatures, causing the surface to dry too quickly.
Based on these ideal conditions, the best time of year to pour concrete in many parts of the United States is often spring or fall.
- Spring: As temperatures slowly rise but aren't yet scorching, and before the hottest parts of summer hit, spring offers a great window. The ground is usually not frozen, and there's less risk of rapid drying. It's often a time of moderate temperatures and generally stable weather.
- Fall: After the peak summer heat has passed and before the deep freezes of winter truly set in, fall can also be an excellent time. The ground still holds some warmth from the summer, and temperatures are generally moderate and predictable for longer periods.
Important Note: Based on our experience, "best time" depends on your location in the U.S. In some milder areas, a clear, dry winter day might be perfectly fine, while in others, you might only have a narrow window in late spring or early fall. Always check the local weather and long-term climate predictions before planning a concrete project. Your local concrete professional will also have invaluable advice based on their experience in your specific area.
Crafting the Perfect Concrete Recipe: Choosing the Right Mix for Your Zone
Just like baking needs the right ingredients for the perfect cake, concrete needs a specific "recipe" to perform its best in different weather conditions and for various uses. This table shows how different concrete mixes and special additives can help your project succeed in any climate.
| Concrete Mix/Additive | What It Does (The Secret Power) | Why It's Important (Your Benefit) | Best For (Climate/Situation) |
| Basic Mix | Cement, water, sand, gravel in the right proportions. | Forms strong, durable concrete. | All climates, as the starting point for any concrete. |
| Water Reducers | Allows you to use less water in the mix while keeping it easy to work with. | Less water means stronger, more durable concrete that lasts longer. | All climates, especially where maximum strength and longevity are desired. |
| Air-Entrained Concrete | Creates tiny, microscopic air bubbles inside the concrete. | These bubbles act like tiny airbags, providing space for freezing water to expand, preventing cracks and crumbling. | Northern States (Midwest, Northeast, Mountain states) with freezing winters and freeze-thaw cycles (driveways, patios, sidewalks). |
| Retarders | Slows down the concrete's setting and hardening time. | Gives workers more time to finish the concrete smoothly and properly before it hardens too much. | Southern and Southwestern States (Arizona, Texas, Florida) or anywhere with scorching hot summers. |
| Accelerators | Speeds up the concrete's setting and hardening process. | Helps concrete gain strength much faster, reducing the risk of freeze damage and keeping projects on schedule. | Colder temperatures or when you need the concrete to be ready for use more quickly. |
Regional Advice for Your Concrete Project
This is where we bring all this knowledge together with real-world examples from different parts of the United States. Concrete performance is highly dependent on the local climate, so what works best in one state might be completely wrong in another.
Phoenix, Arizona (Hot and Dry Desert Climate)
Phoenix is famous for its absolutely scorching hot and very dry summers, with temperatures often soaring well over 100°F.
- Biggest Concerns: The number one issue here is rapid drying and extremely high evaporation rates. This can lead to severe shrinkage cracks and concrete that simply doesn't reach its full designed strength. The intense, relentless sun can also cause the concrete surface to dry much faster than the inside, leading to surface cracking and flaking.
- What Property Owners Should Focus On:
- Schedule Early Morning Pours: Always, always schedule your concrete pours for the coolest part of the day, which means very early morning, often before sunrise. This gives the concrete the maximum amount of time to begin setting before the peak heat arrives.
- Aggressive Curing Immediately: This is absolutely critical in Phoenix! The moment the concrete is poured and finished, it needs to be immediately protected to keep moisture in. This means using curing compounds (which seal the surface to prevent evaporation), wet burlap that is kept continuously damp, or even covering the concrete with plastic sheeting. Some professional contractors even use misting systems to keep the air humid around the fresh concrete.
- Use Retarders in the Mix: Including a retarder in the concrete mix will slow down the setting time, giving the crew more precious time to work with and properly finish the concrete before it hardens too much in the intense heat.
- Provide Shade: If at all possible, try to provide temporary shade over the pouring area to reduce direct sun exposure. This can be as simple as tarps rigged over the area.
Midwest/Northeast US (Seasonal Climate with Freeze-Thaw)
These regions experience all four distinct seasons, with often hot and humid summers, and typically very cold, snowy winters, including significant snowfall and ice.
- Main Challenges: The primary challenges here are the damaging freeze-thaw cycle and the difficulties of cold weather pouring. Additionally, the widespread use of de-icing salts on roads and driveways during winter can be very harsh on concrete.
- Best Practices for Homeowners:
- Air-Entrained Concrete is Mandatory: This is absolutely non-negotiable for any exterior concrete (like driveways, concrete patios, sidewalks, and garage floors) in these regions. It’s your best and most effective defense against the brutal freeze-thaw damage. Insist on it!
- Ensure Excellent Drainage: Make sure water always drains away from concrete surfaces. Avoid any low spots where water can collect and freeze, turning into a damaging ice lens. Sloping your concrete correctly is essential.
- Apply High-Quality Sealers: Applying a good quality concrete sealer annually or every couple of years can add an extra, vital layer of protection against water penetration and also help mitigate damage from de-icing salts.
- Extreme Caution for Cold Weather Pours: If you must pour concrete in late fall, winter, or early spring when temperatures are consistently low, follow all cold weather pouring guidelines: ensure heated materials are used, apply insulating blankets immediately after finishing, and consider using accelerators in the mix to speed up hardening. Avoid pouring when sustained freezing temperatures are expected immediately after your pour.
- Be Mindful of De-Icing Salts: If possible, minimize the use of harsh chloride-based de-icing salts (like rock salt) directly on your concrete. Sand or calcium magnesium acetate (CMA) based de-icers are generally less damaging to concrete.
Coastal California (Mild, Often Humid Climate)
Coastal California often enjoys a milder climate with less extreme temperature swings compared to the desert or the Midwest. While not experiencing harsh freezes, some areas can have significant humidity and sometimes consistent moisture.
- Unique Considerations: While extreme heat or deep freezes aren't the primary concerns, the challenges here often revolve around managing moisture, mild temperature fluctuations, and ensuring long-term durability in a generally temperate environment.
- What Property Owners Should Focus On:
- Proper Curing is Still Key: Even without intense heat, proper curing is vital to achieve full concrete strength. On warm, sunny days, even mild ones, the concrete surface can still dry out too quickly if not protected. Regular misting or covering with plastic sheeting for the first few days is a great practice.
- Drainage, Even Without Freeze-Thaw: While not for freeze-thaw protection, good drainage is still crucial to prevent water from pooling on your concrete. Standing water can lead to issues like mildew, moss growth, staining, and over time, even gradual breakdown of the concrete surface.
- Strength for General Use: Since extreme freeze-thaw isn't a primary concern, focus on specifying a good, strong, all-around durable concrete mix suitable for its intended use (e.g., a driveway will always need to be stronger than a simple walkway). Your local concrete supplier can recommend standard strong mixes.
- Consider Permeable Options for Rain Runoff: In some environmentally conscious areas or where local regulations encourage it, you might even consider permeable concrete. This special type of concrete allows water to filter through it into the ground below, which can be great for managing rainwater runoff and recharging groundwater.
Proper concrete planning for moisture management and durability is key even in milder climates. Connect with a local concrete professional for reliable, long-lasting concrete solutions tailored to Coastal California's unique conditions
What DIY Concrete Mistakes Cost Homeowners Most
Here are some of the most common DIY concrete mistakes that can end up costing homeowners far more than hiring a professional:
Mistake 1: Skipping Proper Ground Preparation
Imagine trying to build a LEGO tower on a wobbly table. It won't stand for long, right? The same goes for concrete. Before you even think about pouring, the ground underneath (called the subgrade) needs to be perfectly prepared. This means:
- Not leveling the ground properly: If the ground isn't perfectly flat and evenly sloped for drainage, your concrete slab will settle unevenly, causing cracks and dips where water can collect.
- Not compacting the base: The soil or gravel base needs to be packed down tightly. If it's loose, it will settle over time, and your concrete will sink and crack.
- Ignoring drainage: If water can pool underneath your concrete, especially in freeze-thaw climates, it can seriously undermine the slab.
What it Costs You: An uneven, cracked, or sinking concrete slab that looks terrible and needs to be completely torn out and repoured much sooner than it should have. This is a huge expense!
Mistake 2: Using the Wrong Concrete Mix
We just talked about how different concrete "recipes" are vital for different climates. Many DIYers just grab any bag of concrete mix they see at the store, not realizing that it might be totally unsuitable for their project or climate.
- Not using air-entrained concrete: If you live where it freezes, skipping air-entrained concrete is like inviting the freeze-thaw cycle to destroy your driveway from the inside out.
- Wrong strength for the job: A walkway doesn't need the same super-strong mix as a driveway that will hold heavy vehicles. Using a mix that's too weak will lead to quick breakdown.
What it Costs You: Concrete that crumbles, flakes, or cracks prematurely, especially after its first winter. You'll be looking at replacing it much, much sooner than you expected.
Mistake 3: Adding Too Much Water to the Mix
This is one of the most common DIY temptations! When mixing concrete, adding a little extra water makes it much easier to pour and spread. It flows so nicely! But this convenience comes at a huge cost.
- Weakens the Concrete: Think of paint – if you add too much water, it becomes thin and doesn't cover well. With concrete, too much water seriously weakens the final product. It dilutes the cement paste, making it less dense and less durable.
- Leads to Cracking and Dusting: Concrete with too much water is more prone to shrinkage cracks as it dries, and its surface might become soft, dusty, and wear away easily (this is called dusting or scaling).
What it Costs You: A weak, soft, dusty, or crumbling concrete surface that cracks easily and wears out quickly, again requiring early replacement.
Mistake 4: Improper Curing (The Forgotten Step!)
Curing is the process of keeping concrete moist after it's poured so it can gain its full strength. It’s like letting dough rise – if you rush it, the bread isn't as good. Many DIYers pour the concrete, smooth it out, and then just walk away. This is a huge mistake!
- Not keeping it wet: Especially in hot or windy weather, concrete dries out too fast if not properly cured.
- Not protecting it from cold: If fresh concrete isn't insulated in cold weather, it can freeze before it's strong enough.
What it Costs You: Concrete that is weaker, more brittle, prone to surface flaking (called spalling), and develops unsightly cracks because it dried too fast. It simply won't reach its potential strength or durability.
Mistake 5: Bad Finishing Techniques
Finishing is the art of smoothing and shaping the concrete surface. It looks easy when a pro does it, but it requires precise timing and skill.
- Overworking the surface: If you smooth the surface too much or too early, you can bring too much water and cement paste to the top, which creates a weak, dusty, or flaky surface.
- Finishing at the wrong time: Finishing concrete too early or too late can lead to a weak surface that's prone to damage.
What it Costs You: An ugly, uneven surface that might be slippery, prone to scaling, or simply doesn't look professional. This visual flaw is hard to hide!
Mistake 6: Ignoring the Weather (The Biggest Blunder)
As we've discussed throughout this article, pouring concrete in extreme hot or cold weather without taking the proper precautions is a recipe for disaster.
- Pouring in extreme heat/cold: This is the quickest way to end up with concrete that is fundamentally flawed, cracks immediately, or never reaches its intended strength.
What it Costs You: Catastrophic failure of your concrete, often requiring immediate, expensive tear-out and repouring. This is usually the most costly mistake of all.
Attempting a large concrete project as a DIY endeavor might seem like a way to save money upfront, but the potential for costly mistakes is very high. These errors often lead to expensive concrete repairs or even complete replacements down the line, costing you far more time, money, and frustration than if you had simply hired an experienced professional from the start.
Don't let a DIY concrete disaster cost you a fortune! For any significant concrete project, big or small, protect your investment by working with experienced professionals. Contact a trusted local concrete contractor near you to ensure your job is done right the first time.
Final Thoughts
Making smart decisions about concrete is a bit like being a savvy project manager for your home. You need to observe the conditions (the weather and climate in your area) and then choose the right tools and techniques (the concrete mix, the best pouring time, and the proper curing methods) to get the job done right.
By understanding how climate impacts concrete, you’re empowering yourself to make informed choices that will save you time, money, and future headaches, ensuring your concrete projects are strong, durable, and last for many, many years to come.