To understand what epoxy flooring is, it is essential to know the primary material used in the process. Epoxy is any of the vital components of epoxy resins, a class of reactive chemicals that contain epoxide groups. Epoxy resins are often used in flooring applications due to their durability, excellent adhesion, and other unique properties. In a typical flooring application, the epoxy resins are mixed with hardeners, forming a rigid plastic material that is so strong and bonds extremely well to almost all types of base layers.
Epoxy floors are mostly used in areas with heavy traffic, including hospitals, sports centers, and industrial environments. But nowadays, epoxy floors are becoming popular in residential areas too. This type of flooring does not have to be done on newly installed concrete floors. Even damaged concrete floors can be applied with epoxy. The self-leveling epoxy floors are the solution for old and cracked concrete floors. They can create a smooth, durable, and industrial-grade flooring surface that you would find comfortable to look at and step on. There are many other epoxy flooring options you can choose from for your specific floor.
Flake floor systems are made when colored chips or flakes are placed within the epoxy to create vibrant, multi-hued, seamless, resilient surfaces. The chips are not only aesthetically pleasing, but their slightly rough surface reduces slips and falls. The flakes are available in an endless variety of colors, styles, textures, and sizes and can be mixed into the combination of your choice. For more detailed information about epoxy flooring, simply visit https://www.performanceindustrial.com/2016/02/25/what-is-epoxy-flooring/.
Epoxy flooring, just as other flooring options, has its pros and cons. But compared to an average floor, epoxy floors have a lot more advantages. One of the main advantages of an epoxy floor over others is its appearance. An epoxy floor looks bright and professional due to its smooth and even surface. It is also very easy to maintain. Furthermore, an epoxy floor is also very resistant to most elements, including oil, bleach, gas, and cleansers.
Compared to other types of flooring, the per square foot cost of epoxy floors are tough to beat. Since it can be installed directly over concrete and other flooring types, the installation costs are quite a bit lower than the others. Pricing remains one of the biggest and the most immediate advantages you’ll find with epoxy flooring. If you are interested about the topic, check out the full article at its main source.
Epoxy is always a great option to decorate your floors. If you feel like your current flooring is a bit try and monotonous in appearance, you should consider getting epoxy flooring. There are many contractors today that offer epoxy flooring services to residential areas. You will know all your options once you get in touch with a contractor that provides this kind of service. Maybe it is about time to upgrade your home’s aesthetics.
| Additional reading: | |
| Title: | HTML: |
| Epoxy Coat a Garage Floor | |
| Blending Epoxy Flooring |
Step By StepSafety: (if epoxy)Wear chemical goggles when blending the epoxy. Wear nitrile gloves when handling the epoxy. Safety: (if polyavastic)ALWAYS wear a respirator with a 3M 6001 Organic Vapor Cartridge when working with polyavastic, whether blending, troweling or topcoating. Be sure to follow the cartridge replacement plan. Wear chemical goggles when blending the polyavastic. Wear nitrile gloves when handling the polyavastic. Step 1The first step is to prepare the surface and remove any existing coating or concrete laitance. The surface needs to be porous and able to absorb the adhesive binder. You can do this simple test – pour a little solvent on it and see if it soaks in. If the solvent lays on the surface than you need to scratch up the surface further. Use Xylene or M.E.K. as the solvent – you will also use this to keep your tools clean. Step 2The next step is to prime the floor. Unless your floor has a moisture problem – then this primer step is skipped and you will use our Vapor Vent epoxy stone flooring method instead. Step 3Mark out your first section on the floor so you know how much area each kit needs to cover. Make sure your gauge rake is set to the proper depth – which is usually 1/8″ more than the desired thickness. You may need to mark out the next section before blending each new batch until you are confident that you are getting the right coverage. 32 square feet per kit at a depth of 3/8″ 24 square feet per kit at a depth of 1/2″ (we recommend a depth of 1/2″ for pools, patios and walkways) 16 square feet per kit at a depth of 3/4″ (we recommend a depth of 3/4″ for driveways) Step 4 (if epoxy)Blending Instructions: Add 2 quarts of Pebblestone Epoxy Part A into 1 quart of Pebblestone Epoxy Part B and blend thoroughly. Pour the blend over 2 bags of pebbles. Blend thoroughly. Step 4 (if polyavastic)Blending Instructions: Pour the whole quart can of Polyavastic part B into the short-filled gallon can of Polyavastic part A and blend thoroughly. Pour the blend over 2 bags of pebbles. Blend thoroughly. Step 5Pour out the pebbles and spread them with the gauge rake to get a uniform coverage. Then use a finish trowel to smooth out the pebbles to make an even surface. Try to have an even finish with no trowel marks or stray rocks sticking up. It is easy to do a nice job, but it does take extra time. If you try to hurry it will not look nice. Step 6The next step is to let the pebblestone get hard. Indoor epoxy will be cured the next morning. Outdoor polyavastic will take an extra day to cure. Then scrape off any stray pebbles that are sticking up and sweep or blow off the floor to remove the extra pebbles. Step 7 (if epoxy)Topcoat Blending Instructions: Add 2 quarts of Pebblestone Epoxy Part A into 1 quart of Pebblestone Epoxy Part B and blend thoroughly. Roll an even topcoat over the pebblestone. * Approximate coverage for 1 kit (3 quarts) of pebblestone epoxy (for topcoat) is 100 square feet. Step 7 (if polyavastic)Topcoat Blending Instructions: Pour the whole quart can of Polyavastic part B into the short-filled gallon can of Polyavastic part A and blend thoroughly. Do not try to split the kit. If you must split a kit, be sure to throughly blend the part A before pouring it because some components of the part A will have settled to the bottom of the can. Then split by weight – 2 parts Polyavastic part B to 3 parts Polyavastic part A. Read more: https://www.everlastepoxy.com/everlast-epoxy-floors-installation. |
| Epoxy Flooring Sample | 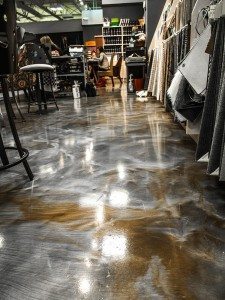 |
| Designer Metallic Epoxy Floor Installation | |
| Gold Glitter Epoxy Floor | |
| More on Epoxy Floors | |