
A new concrete patio is much more than just a simple slab; it is the foundation for countless outdoor memories, from relaxed afternoon barbecues to lively evening get-togethers with family and friends. Creating this functional and beautiful space yourself is a gratifying DIY project that adds significant value and appeal to your home. While the task might seem intimidating, a methodical approach and a commitment to proper technique can lead to a professional-grade result that will last for decades.
This comprehensive guide empowers you with the knowledge and confidence to tackle your patio pouring project from start to finish. We will cover every essential step in meticulous detail, emphasising the importance of thorough preparation and quality workmanship. By focusing on a solid foundation and correct application, you will build a patio that is not only visually pleasing but also exceptionally durable, ensuring a safe and stable area that stands the test of time.
Planning Your DIY Patio
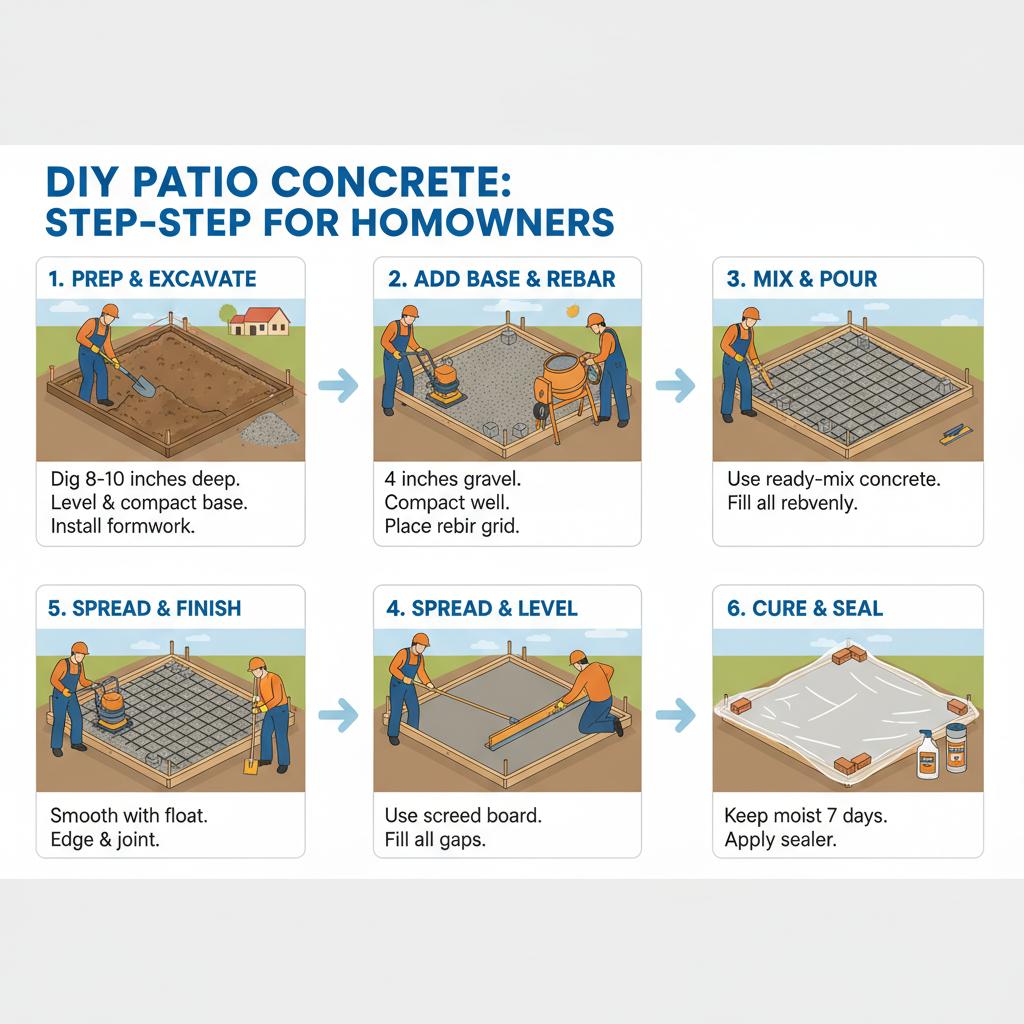 Every successful construction project, regardless of scale, begins with careful and detailed planning. Before you even think about buying a single bag of concrete, you need to finalise your vision and make practical decisions about the patio’s location, size, and layout. This initial phase will save you significant time, money, and frustration down the track, so it is well worth the extra effort.
Initial Site Assessment
Start by observing your outdoor space and choosing the optimal location for your patio. Think about how the sun moves across your property during the day; will the patio be in full sun, partial shade, or heavy shade? Consider the prevailing wind direction to ensure your new outdoor area will be a comfortable place to sit. Privacy is another crucial factor. Will the patio be visible to neighbours, and do you need to incorporate screening or plants to make it more secluded? Take note of any pre-existing backyard features like trees, gardens, or pathways that might affect your planned layout.
Sizing and Layout
The size and shape of your patio should be in proportion with your house and its intended use. A good rule of thumb is to create a space that is large enough to comfortably accommodate all your planned furniture without feeling cramped. You want to ensure there is enough room to pull out chairs and move around freely. Consider the main access point from your house, and plan the layout to create a seamless flow between indoor and outdoor living areas. Think about how the new patio will complement other backyard features and create a cohesive design. A well-proportioned patio will feel like a natural extension of your home.
Budgeting and Materials
It is wise to establish a detailed budget before you start. This should account for all materials, including the concrete itself, the sub-base gravel, timber for the formwork, and steel reinforcement. Don't forget to budget for tools and equipment, such as a concrete mixer, wheelbarrows, shovels, levels, and finishing tools. You might be able to hire some of these to save on costs. While the temptation is to cut corners on materials, using quality components will ensure your patio is strong and long-lasting, preventing costly fixes in the future.
Preparing the Groundwork
The foundation is the most critical part of the entire project. The quality of your patio will ultimately be determined by the care and precision you put into preparing the ground. A poorly prepared base can lead to cracking, sinking, and uneven surfaces, so take your time with each of these steps.
Clearing and Excavation
Begin by marking out the exact dimensions of your patio using string lines and stakes. Next, clear the entire marked area of all vegetation, including grass, weeds, and any large roots. Dig out the top layer of soil to the required depth, which should be the combined thickness of your compacted base layer and the concrete slab. For most residential patios, a total depth of around 200mm is sufficient; this allows for a 100mm compacted gravel base and a 100mm concrete slab.
Compaction and Base Layer
Once you have excavated the area, you need to compact the subgrade (the earth underneath) to create a firm, stable foundation. You can do this with a plate compactor, which can be hired from a local equipment supplier. After compacting the subgrade, you should spread a layer of crushed rock or gravel. This layer, typically 100mm deep, serves several purposes. It provides a solid, uniform surface for the concrete and, crucially, helps with drainage by allowing water to move freely beneath the slab, preventing a build-up of hydrostatic pressure.
Slope for Drainage
One of the most common and costly mistakes in concrete work is failing to plan for proper drainage. A flat slab will inevitably lead to water pooling, which can cause cracking during freeze-thaw cycles and lead to a slippery surface. You must create a gentle slope, or fall, that directs water away from your house and other structures. A standard recommendation is a fall of at least 25mm for every 3 metres of length. You can achieve this by setting your formwork to the correct grade. This ensures that rainwater runs off the patio and into a designated area, such as a garden or a proper concrete drainage system.
Setting Up Forms and Reinforcement
The formwork is the mould that holds the wet concrete in place and defines the final shape of your patio. Strong, properly constructed forms are essential for a professional finish. You also need to add reinforcement to give the concrete strength and resilience against future cracking.
Building and Securing Forms
For most patios, timber planks are the best choice for formwork. Use straight, sturdy timber, such as 100mm x 50mm boards. Secure these planks on edge around the perimeter of your patio, using timber stakes driven firmly into the ground every 600mm to 900mm. Check the top edge of the formwork with a spirit level to ensure it is perfectly level side to side and has the correct fall for your planned drainage. Use screws or nails to attach the timber to the stakes, creating a robust frame that can withstand the immense pressure of wet concrete.
Reinforcement Options
Concrete is incredibly strong under compression but weak under tension. Reinforcement provides the tensile strength needed to prevent cracking and give the slab long-term stability. The two most common options are steel mesh and rebar (reinforcing bar).
- Steel Mesh: This is the most popular and easiest option for residential patios. It comes in large sheets and should be cut to fit within the formwork, leaving a gap of about 40mm from the edges.
- Rebar: Individual steel bars can be tied together to create a grid. Rebar is often used for thicker, more heavily trafficked slabs, like those used for garage floors.
Whichever option you choose, the reinforcement must be properly positioned within the concrete. It should not rest on the ground. Use small concrete blocks or specialised plastic bar chairs to lift the mesh or rebar so that it will be suspended in the middle of the slab's thickness. This ensures the steel is fully encased and provides maximum strength.
Mixing and Pouring the Concrete
With all the groundwork and formwork complete, you are ready for the main event. Mixing and pouring concrete is a physically demanding and time-sensitive task, so it is a good idea to have a few helpers on hand to make the process easier and more efficient.
Calculating and Ordering Concrete
Before you start, accurately calculate the volume of concrete you will need. The formula is length x width x thickness. For example, a 5-metre by 4-metre patio that is 100mm thick would require:
5m x 4m x 0.1m = 2 cubic metres.
It is always a good idea to add a small buffer (about 10%) to account for minor errors or uneven ground. For smaller projects, you can mix concrete yourself using bags of premixed concrete and a portable mixer. For larger jobs, it is much more practical and cost-effective to order a ready-mix truck, which will deliver a consistent, professional-grade mix right to your site.
The Pouring Process
Once the concrete arrives, the clock starts ticking. The concrete will begin to set quickly, so you need to work fast. Pour the concrete directly into the forms, starting at the far end and working your way back towards the mixer or access point. Use a shovel or a rake to spread the concrete evenly. Have your team help move the concrete around to ensure there are no voids or low spots.
Screeding and Initial Levelling
The next crucial step is screeding, which is the process of levelling the concrete to the height of your formwork. Use a long, straight timber board, known as a screed board, to strike off the excess concrete. Place the board on the forms and, with a sawing motion, pull it across the surface. This will remove any high spots and fill in any low spots. Repeat this process as needed until the surface is flat and level with the top of your formwork.
Finishing the Surface
Once the concrete has been poured and screeded, it needs to be finished. This is the stage where you give the patio its final texture and appearance. The timing is critical; you must wait until the concrete is firm enough to work on, but not so hard that you cannot manipulate the surface.
Floating and Trowelling
After screeding, the surface will be rough. You need to use a bull float to smooth the surface and bring the cement paste to the top. This also helps to embed any larger aggregate pieces below the surface. After floating, you should wait for the concrete to set slightly, a process known as 'bleeding', where excess water rises to the surface. For a smooth finish, you will use a hand trowel or a power trowel. This process compacts the surface, making it denser and more durable. The techniques are similar to what is required for perfectly smooth garage floors.
Textured and Decorative Finishes
A perfectly smooth finish can be slippery when wet, so for a patio, a textured or non-slip finish is often preferred.
- Broom Finish: A popular and easy option. Once the concrete is firm but still wet, pull a stiff-bristled broom across the surface in long, even strokes. This creates fine lines that provide excellent traction.
- Exposed Aggregate: This is a fantastic decorative concrete option. After the initial trowelling, you wash away the top layer of cement paste to expose the beautiful coloured stones or aggregate below.
- Stamped Concrete: For a high-end look, you can use rubber mats with pre-designed patterns to press a texture into the concrete that mimics brick, slate, or cobblestones. This can make the patio an amazing feature, truly a piece of decorative concrete art.
Edging and Control Joints
Use an edging tool to create a smooth, rounded edge around the perimeter of the slab. This not only looks professional but also prevents chipping. You must also install control joints, or saw-cut grooves, in the slab. Concrete naturally expands and contracts with temperature changes, and these joints are designed to create a weak point where cracks can occur predictably, preventing unsightly, random cracks from forming.
Curing and Protecting Your Patio
Curing is arguably the most important part of the entire process for ensuring the long-term strength and durability of your concrete. It is a chemical reaction that requires a consistent supply of moisture. Without proper curing, a patio can lose as much as 50% of its potential strength.
The Curing Process
Curing involves keeping the concrete slab moist for an extended period, typically seven to ten days, but longer is always better. This allows the cement to fully hydrate and bond with the aggregate, forming a strong, crystalline structure. Rushing this process by letting the concrete dry too quickly can lead to a weak, powdery surface and increased risk of cracking.
Curing Methods
There are several effective methods for keeping the concrete moist.
- Wet Curing: Regularly spray the surface of the concrete with water from a hose several times a day. This is a very effective method, especially in hot, dry weather.
- Plastic Sheeting: Cover the entire slab with plastic sheeting, held down at the edges with timber or rocks. This traps the moisture from the concrete itself, creating a humid environment for curing.
- Curing Compounds: You can apply a special curing compound to the surface. These liquid membranes create a seal that prevents moisture from evaporating, making the process much easier and less labour-intensive.
Protection During Curing
During the curing period, the concrete is vulnerable. Protect the new slab from heavy rain, extreme heat, or direct sunlight for the first 24 to 48 hours. Set up a temporary shade structure or cover it with plastic. Keep all foot traffic and any heavy objects off the slab for at least a week. Avoid placing furniture on it for at least 28 days, which is when the concrete will have reached its full strength.
Maintenance and Minor Repairs
A well-constructed patio is a low-maintenance addition to your home. However, a little care and attention will keep it looking its best for many years and extend its life.
Routine Cleaning and Sealing
Once the patio has fully cured, it is highly recommended to apply a concrete sealer. This protective coat will repel water and oil, preventing stains from spills and making cleaning much easier. Reapplying the sealer every few years is a simple repair that will help maintain your patio's appearance and protection. For regular cleaning, a simple sweep and an occasional wash with a garden hose and a soft brush is usually all that's required.
Handling Cracks and Spalling
Over time, you might notice small hairline cracks. These are normal and are not usually a sign of structural failure. For these minor imperfections, a simple repair can be done with a concrete crack filler, which you can find at any hardware store. For larger cracks or issues like a sunken slab, you might have a more serious problem. These issues are often a sign of poor subgrade preparation or inadequate drainage, and they may require a professional opinion or a more extensive repair to the foundation.
Mistakes to Avoid in DIY Patio Pouring
Knowing what can go wrong is just as important as knowing what to do right. Most common DIY mistakes are avoidable and can be prevented with proper planning and patience.
Inadequate Site Preparation
The single biggest mistake is neglecting the site preparation. Rushing the clearing, excavation, and compaction of the subgrade will almost certainly lead to problems down the line, such as a sinking slab or uneven surfaces. The base is your foundation, and if it is not solid, the entire project will be compromised. This is true for any concrete slab, including garage floors and footpaths.
Rushing the Process
From pouring to curing, every step has a required time frame. Pouring on a hot day without proper preparation, trying to finish the surface too early, or failing to cure the concrete will have negative consequences. Concrete needs to be worked with speed during the pour but given time to set and cure properly. Patience is your most valuable tool.
Ignoring Drainage and Reinforcement
As we have emphasised, proper drainage is non-negotiable. A sloped slab and a good base layer are essential for a long-lasting patio. Similarly, skimping on reinforcement is a critical error. The steel mesh or rebar is what gives the slab its strength and prevents it from cracking from natural ground movement.
Conclusion
Building your own concrete patio is an ambitious but rewarding project that can fundamentally change the way you use your outdoor living space. By following this detailed guide, you have the knowledge to approach each step with confidence and precision. From the initial planning and crucial site preparation to the final touches and proper curing, every stage contributes to a successful outcome. The journey from a patch of earth to a beautiful, durable patio is a testament to your hard work.
Remember to take your time, trust the process, and never compromise on quality. The end result will be a beautiful and functional space that is perfectly suited to your needs and becomes a cherished part of your home. A well-built patio is more than just a surface; it is a stage for future memories, and a new focal point for all your backyard features.